


We used to talk about data pipelines as basement plumbing. You only noticed them when they leaked. If the dashboard loaded and the numbers looked correct, the pipeline was doing its job. You didn’t invite the plumber to the strategy meeting. In 2026, that has changed. We have more data than we can process, yet […]
How to Choose the Right House Construction Company for Your Dream Home?

Choosing the right house construction company is crucial for a smooth home-building experience. Homeowners often underestimate the impact of this decision, the wrong builder can cause major delays, unexpected costs, and even structural problems. This guide breaks down everything you need to vet and compare builders. Why the Right Builder Matters Your choice of builder […]
Why AI-Powered Feedback Tools Are Replacing Traditional Surveys (And What to Use Instead)?

Traditional Surveys vs AI-Powered Feedback Traditional survey platforms (e.g. email questionnaires, paper forms, even legacy tools like SurveyMonkey or Qualtrics) often yield poor engagement. For example, a case study noted traditional methods typically get 5–15% response rates. In contrast, AI-driven conversational methods can jump to 30–50%, a 3–5× increase. Improved rates come from using natural […]
Website UX Mistakes That Hurt Small Business Growth

Small businesses often invest in ads, social media, and content, but still struggle to turn visitors into customers. In many cases, the problem is not visibility. It is the website experience itself. Small UX and UI issues can quietly reduce trust, lower conversions, and push people away before they take action. This is why website […]
Why “Going Small” Is the Only Way to Win in Marketing Today
If you have been buying digital ads lately, you have probably noticed the same thing I have, which is that the bill climbs fast while the attention you get in return feels thinner than it used to.Most people are tired of being sold to. They scroll past sponsored posts on Instagram and ignore banners on […]
- How-To
- ...
The Ultimate Guide to Comparing Tech Products Before You Buy

Build a Structured Process for Comparing Tech Products Embedding structured comparison methods into your buying process can save time and prevent regrets. As one guide puts it, a “structured checklist” helps you avoid impulse decisions and choose the right tech product for your needs. The first step is always defining your use case and budget. […]
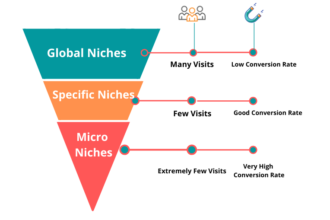
The Power of Hyper-Niche Marketing: How Kawaii Culture is Winning E-Commerce

Introduction In the early days of e-commerce, the ultimate goal for most businesses was to become the next Amazon—a digital megastore selling everything to everyone. However, in 2026, the digital landscape has shifted. Customer acquisition costs are skyrocketing, and as highlighted by recent e-commerce market analyses on Forbes, competing on broad terms is a losing […]
How a Social media post generator can transform your content strategy?

Have you ever felt stuck with what to post next? A social media post generator is like a helper that takes the pain away. It automatically creates posts or captions for you, giving you fresh ideas and consistent updates. These tools analyze trends and produce tailored posts in seconds, saving you time and effort. Imagine […]
Why Everyone Should Travel Alone at Least Once

Imagine stepping off a train in an unfamiliar town at dawn, the sun rising over rooftops and no one waiting at the station to guide you. This is exactly the scenario I found myself in on my first solo trip a mix of thrill and nervous excitement. Traveling alone can feel like stepping into a […]
Underrated Cities That Deserve More Attention Than Famous Tourist Hotspots

Globetrotting beyond the usual tourist trails can be surprisingly rewarding. Iconic cities like Paris or Tokyo sparkle on everyone’s list, but there are countless underrated cities waiting to be discovered. These lesser-known destinations often offer the same cultural richness and scenic beauty as their famous counterparts – but with smaller crowds, shorter lines, and lower […]